
M2 Services Contacts Adding and Email Guide
Prerequisites: Ensure you are logged into DME Constant Contacts Access Account.

1. Login to M2 Services Constant Contact Account
-
Open your web browser and login to the M2 Services Constant Contact Account.

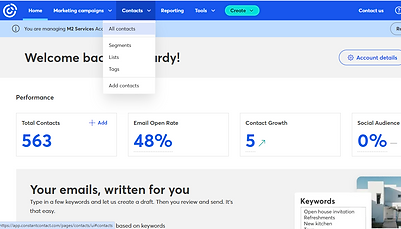
2. Navigate to All Contacts
-
In the dashboard, locate and click on the "All Contacts" option to manage your contact list.
3. Add Contacts
-
Select the "Add Contacts" option to initiate the process of adding new contacts to your list.
-
From the available options, select "Type or Paste Contacts" to manually input contact information.

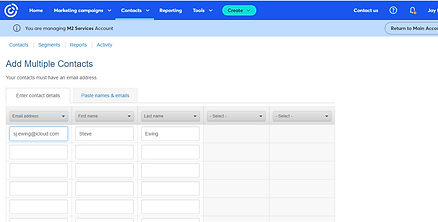
4. Input Information from Jaclyn's Email
-
Refer to the email sent by Jaclyn and input the required contact information into the provided fields.
-
Click "Continue" to proceed to the next step.
5. Create New List
-
After entering the contact information, choose to create a new list using the email address of the contact being added and apply it.
-
Return to the home screen or dashboard of Constant Contact.


6. Find Previously Sent and Scheduled Emails
-
Scroll down to the bottom of the page where you can find the section for previously sent and scheduled emails.
-
Locate the campaign you want to send to the new contact.
-
Copy the campaign, as you'll be customizing it for the new contact.
7. Change Email Address in Campaign Name
-
change the email address in the campaign name to match the email address of the new contact.


8. Continue and Select Email List
-
Continue with the customization of the email campaign.
-
Select the email list you created earlier containing the new contact.
-
Schedule the email based on the date provided in Jaclyn's email.
-
Add one and a half hours to the specified time.
-
Click "Schedule" to set the delivery time.